
Shut the water, cut the main, add a bypass, connect drain with an air gap.
If you want a clean install and soft water that lasts, you’re in the right place. I’ve plumbed, fixed, and optimized many systems in tight closets and full basements. In this guide, I’ll show you how to plumb a water softener the right way, with clear steps, code-safe tips, and pro lessons that save time and leaks.
:max_bytes(150000):strip_icc()/installing-a-water-softener-2718669-FINAL-1-ee8de137dcf84b5db1e28f84a7dec11b.png)
Plan First: Location, Codes, and Sizing
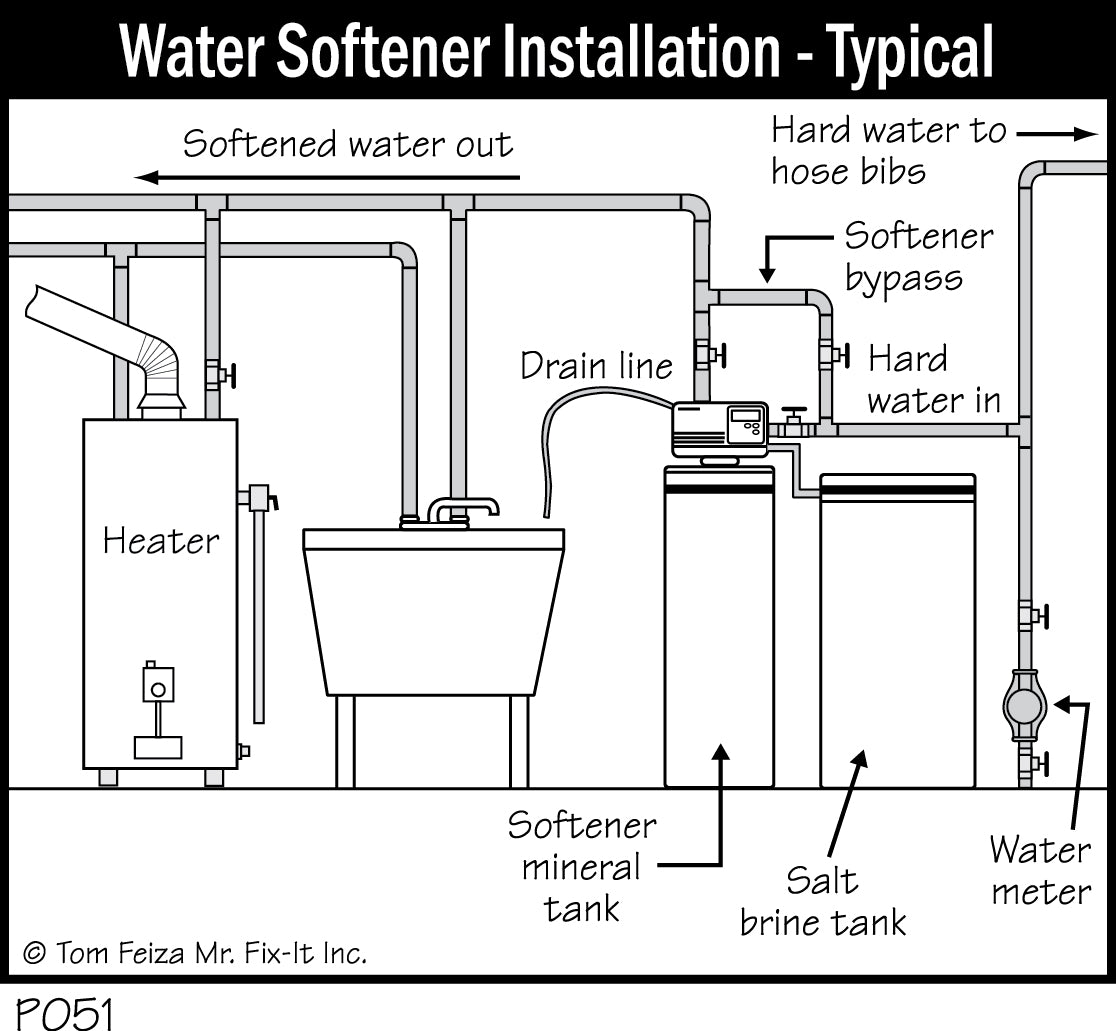
Good installs start with a plan. Place the softener near the main cold line, before the water heater. Keep hose bibs and irrigation lines unsoftened. You will need a nearby drain with a code-compliant air gap and a standard outlet for the control head.
Check local plumbing codes and permits. Most codes require an air gap on the discharge and a proper trap. Avoid saddle valves. Use full-port valves. If you are not sure, ask your building department. It is faster than rework.
Size the unit to your home. Match grain capacity to your hardness, iron level, and household use. Most homes do well with 32,000 to 48,000 grains. If you run large tubs or have 1-inch mains, size up to reduce pressure drop. If your water has iron, plan for a prefilter or resin cleaner.
Before you pick up tools, test hardness. Convert ppm to grains per gallon by dividing by 17.1. You will program this value later.
Tools and Parts You Will Need
You will save time if you stage all parts first. Here is a clean, flexible kit list.
- Tube cutter, deburring tool, and measuring tape
- Two adjustable wrenches and a gentle torque sense
- Torch and solder, or press tool, or PEX crimp/expander set
- Pipe and fittings to match your line: 3/4 inch or 1-inch copper, PEX, or CPVC
- Two ball valves for isolation and one full bypass valve, or a factory bypass
- Union fittings on both sides of the softener for easy removal
- NPT to your pipe adapters for the inlet and outlet ports
- Teflon tape and pipe dope for male threads only
- Drain tubing rated for hot and brine discharge, plus an air gap fitting
- Brine overflow tubing to a safe drain with an air gap
- A sediment prefilter, if your water has grit or iron
- A bucket, towels, and a spray bottle of soapy water for leak checks
Step-by-Step: How to Plumb a Water Softener
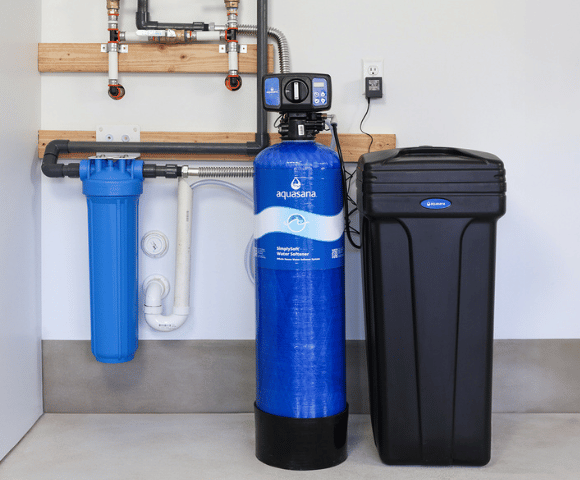
This section shows how to plumb a water softener from shutoff to start-up. Read through once, then work step by step. Take your time. Clean work prevents leaks.
-
Shut down and drain
Turn off the main water valve. Open a low faucet to relieve pressure. Turn off the water heater’s cold supply. If it is gas, set it to vacation. If it is electric, switch off the breaker. -
Mark the tie-in point
Find the main cold line after the meter and before the branches to the water heater. Leave outdoor spigots unsoftened. Mark your cut points so the softener can sit between two straight runs. -
Cut and prep the line
Cut the pipe clean and square. Deburr the ends. Dry fit your valves and unions. Plan the bypass path. Keep the softener straight and level to reduce strain. -
Build the bypass and isolation
Install two ball valves on the supply and house sides. Add a bypass loop or use the factory bypass on the softener head. Unions on both sides let you pull the unit later with no drama. -
Connect the inlet and the outlet
Follow the arrows on the control head. Inlet goes to supply. The outlet goes to the house. This is the most common mistake I see. Use NPT adapters for your pipe type. Support the pipes so the head does not carry the load. -
Choose your join method
For copper, clean, flux, and solder away from the softener to protect seals. For press, align and press to spec. For PEX, crimp or expand per the tool system. Push-to-connect fittings are fine in a pinch, but I prefer permanent joints for long-term trust. -
Run the drain with an air gap
Connect the softener drain line to a standpipe, floor drain, or utility sink with an air gap. Most codes require a gap of at least one inch above the rim. Secure the line so it will not pop out during regen. Avoid lifting the drain higher than the head’s rating. -
Add the brine overflow line
Run the overflow from the brine tank to the same drain with an air gap. This is a safety line, not the main drain. Do not cap it. -
Install a prefilter if needed
If your water has sand or iron, add a sediment filter before the softener. It keeps the resin bed clean and extends life. -
Power and salt
Plug the unit into a nearby outlet. Use a drip loop. Fill the brine tank with clean salt. Solar or pellet salt is fine. If you have iron, use salt with resin cleaner or add cleaner monthly. -
Leak and pressure checks
Close the bypass. Open the main valve a little. Crack the inlet valve and purge air. Open the outlet valve. Check every joint with soapy water. No bubbles, no leaks. -
Program and sanitize
Set the time, hardness, iron, and regen settings. Many manuals call for a sanitize cycle with a bit of bleach. Run a manual regen to draw brine and rinse the resin.
This step-by-step path shows how to plumb a water softener without stress. If you work slowly and test often, you will get a clean, code-safe setup.

Start-Up, Programming, and Testing
Program hardness in grains per gallon. If your report shows ppm, divide by 17.1. Add 1 gpg for every 1 ppm of iron as a rule of thumb. Set reserve so you do not run hard before regen. Metered units save salt and water.
Run a manual regen and watch the drain. You should see a steady flow. After the rinse, test a cold faucet for softness. Soap should lather fast. A test strip should read near zero grains. If the water is not soft, verify the inlet and outlet and the brine draw.
Log your settings and install date. A photo of the control head helps later.
Common Mistakes and How to Fix Them
These are mistakes I see in the field and how to fix them fast.
-
Reversed inlet and outlet
Water stays hard, and the flow feels odd. Swap lines to match the arrows. -
No air gap on the drain
This can pull waste back into your system. Add a proper air gap fitting. -
Saddle valves or tiny drains
They clog and can flood. Use full-port valves and a drain that matches the rated flow. -
Unsupported piping
Weight cracks heads over time. Add hangers so the head does not carry the load. -
Overtightened plastic threads
They crack days later. Use tape and dope on male threads and snug, not brute force. -
Long drain runs with high lifts
The head cannot push the brine that far. Shorten the run or drop the height.
This is the practical side of how to plumb a water softener. Avoid these, and your install will run quiet and clean.
Maintenance Tips From the Field
Keep salt two-thirds full. Do not heap it on the lid. Break salt bridges with a broom handle if the tank looks full but the water is hard. Clean the brine well once or twice a year.
Use resin cleaner if you have iron or manganese. Replace the prefilter every few months if you have grit. Sanitize the unit yearly with a small dose of bleach per the manual.
Watch your pressure. A big drop means a clogged prefilter or resin bed. Quick checks like these make how to plumb a water softener feel simple even years later.
Costs, Time, and When to Call a Pro
Most DIY installs take half a day to a day. branches time if you move pipe or add drains. Plan your cut list and measure twice. It saves the run to the store.
A solid mid-range unit plus parts often runs a few hundred to over a thousand dollars, based on size and brand. Add the cost of valves, unions, and fittings. If you are not sure about cutting mains, code needs, or drains, hire a pro. The fee is small next to the cost of a flood.
When you ask a pro how to plumb a water softener, they will talk about layout, isolation valves, and air gaps. These are the same steps you now know.

Frequently Asked Questions
Where should a softener go in the plumbing?
Place it on the main cold line before the water heater. Keep hose bibs and irrigation unsoftened to save salt and protect plants.
Do I need a drain and an air gap?
Yes. The unit discharges during regeneration. An air gap prevents backflow and is required by most codes.
What pipe type works best?
Copper, PEX, and CPVC all work if installed right. Match fittings to your pipe and follow the manufacturer’s spec.
How long does it take to install?
Most DIY installs take 4 to 8 hours. Add time if you need to move the pipe, add a prefilter, or run a new drain.
Can I use push-to-connect fittings?
They work for many setups, but verify they are rated for your pipe and location. I prefer permanent joints for long-term reliability.
What size softener do I need?
Match grains to your hardness and water use. Many homes require 32,000 to 48,000 grains; large homes or high hardness may need more.
Why is my water still hard after the install?
Check inlet and outlet orientation, salt level, and brine draw. Run a manual regen and test again.
Conclusion
You now have a clear, safe path for how to plumb a water softener from plan to first soft shower. Pick the right spot, install a solid bypass, run a proper air-gapped drain, and test as you go. These small choices make the system last and keep leaks away.
If you are ready, gather your parts and start with the plan and valves. If you want more help, bookmark this guide, explore more tutorials, or leave a comment with your setup and questions.
Pingback: Can You Use A Wok On An Electric Stove: Best Tips 2026
Pingback: How To Remove Grease From Cabinets Above Stove: Quick Fixes
Pingback: How Do Living Roofs Support Biodiversity: Quick Guide 2026
Pingback: Why Does My Roof Of Mouth Hurt: Causes & Relief
Pingback: Why Does My Roof Of Mouth Hurt: Causes & Relief
Pingback: How Do Living Roofs Support Biodiversity: Quick Guide 2026
Pingback: Can You Use A Wok On An Electric Stove: Best Tips 2026
Pingback: How To Get Melted Plastic Off Stove: Safe Cleanup Tips